Showing posts with label DIY. Show all posts

Thursday, October 18, 2012

a little update...

Hellooooo everyone!

I thought I'd take a few minutes to post a bit of a house-and-DIY-update, if that's okay with you!  We've been pretty busy around here lately, with little tweaks and changes.  Bryce and I joke every Friday because he comes home and everything's been moved around.  What?  I can't help it!  That's what happens when I get left alone for awhile.  I start thinking up new projects.  So here's the result of some of that:

 First up, these lovely chairs from my Grandma.  I loved the wood and the shape, and I thought they would be simple enough for a first real reupholster job.  (In hindsight, still not that easy...but that's how I usually roll.  You know, underestimating the effort.  But the risk is part of the thrill of DIY!)


This was the previous layer underneath.  My Grandma had already covered them a couple times - which was good because her experience was critical to our success!


Seriously, she's awesome.  She even sewed the seat cover for me!


Also an important mention is my Grandpa's pristine wood glue job on a piece that broke off.  Can't even tell.


Lot's of pulling and stapling!  And then finishing with a double welted cord glued around the top (over the staples).


Also, I made that pillow!  And a matching one for the other chair.  (You can see the first chevron ones with a tutorial here).  Also in my pillow making spree, my friend Autumn and I made these for the bed:

Before - the white pillows were okay, but not long enough.  You can see that the back ones are pushed to the middle, and the second row pushed to the outside to give the illusion that they do.  But sadly, that Greek pillow in the middle is falling through the crack... (don't mind the fabric samples :)


After!  Much better proportions.  And I love the contrasting patterns.  It looks even better in person!  Next step is to get a headboard to fill the wall a bit.  And to add some more art - that poor canvas is a little lost on the big wall.  Also, some matching lamps for the side tables (with a lime green glass base or something bright to bring out the green in the pillows.)  But we're getting there!


A collage wall with pics above the long china cabinet: (although I have that light fixture on Kijiji because it's totally in the way!  It's nice though, if anyone's interested...)


And finally, I saw this sweatshirt idea on Pinterest and I had a blank navy sweatshirt so I figured why not?  It's probably one of my favourite items now...


I've got lots of other projects in motion - such as painting something on this huge blank canvas... perhaps tomorrow?


Anyway, hope you've taken some time to hear leaves crunching under your feet and sip some hot apple cider!

Friday, September 21, 2012

DIY Envelope Pillow

Call me crazy, but when my first package from Tonic Living arrived this week, I felt like Christmas morning.  I had spent too much time thinking about what patterns and colours would work best for some pillows I wanted to make, that I was starting to have commitment issues.  Even when I ordered 10 samples to narrow down the choices, I still had a hard time deciding.  But I finally committed!  My first project - the chevron print pillows for the couch.  Here's the instant replay for you:

My pillow form was 16"x16".  So I cut the back piece to 17" wide (allowing an inch for seams) and 23" high.  


Then, cut it in half so that you have 2 pieces that are 11.5" (still 17" wide).


Cut the front to 17"x17".  If your pillow isn't square, you want to make sure you cut the width to match which way you want your pattern to be.


Take half of your back piece and iron a hem - start by ironing 1/4" up...


Then hem and iron again at 1/4".  Ironing helps to make sure the hems are straight!


Do the same thing with the other piece, then stitch the hems straight across.


Lay the front piece, right side facing up.  Line up the unhemmed part of the square with the bottom of the front piece.  This piece should have the front side facing down.


See how the right sides are together? 


Then, lay the other piece on top, with the right side facing down.  Line up the edges with the front piece.  The 2 back pieces should overlap by 4 inches or so.


Pin it all down to secure it!


Then, stitch all the way around.  At the corners it helps if you leave the needle in the fabric, then lift the foot and just pivot the fabric to start the new side.  Saves thread :)


Trim all the edges to 1/2" seams, then turn it right sides out.  Push the corners out so they look neat and take time to iron all the edges to be nice and crisp.


Stuff in your pillow form - you may have to knead it a bit to fill out the new pillow case.


Voila! Once you get good at it, this type of project will take 30 minutes or less.  Oh, and another tip?  I used 2 different fabrics because the patterns I chose were up to $25/yard...not outrageous, considering I could make 2 pillows with 1 yard, however I wasn't willing to double the cost to have the pattern on the back as well.  So I just found something solid that matched and was half the price :)  Happy sewing!


I've got some more fabric for pillows - hopefully to be completed this weekend.  One pattern I'm particularly excited about - stay tuned!

Sunday, January 2, 2011

a year of DIY.

Hello blog readers!

I hope you had a wonderful New Years celebration! Happy 2011!

I thought I'd take a look back at all of the DIY projects I completed in 2010 - it was more than I even realized! Here's a recap of my favourites...

- ray-ban pillows.


- jersey car visor cd holder.


- tribal print skirt.


- side table makeover! before.

- after.


- custom duvet cover (fabric by mood).


- floral print skirt.


- jersey tube top.


- 70s chair makeover.


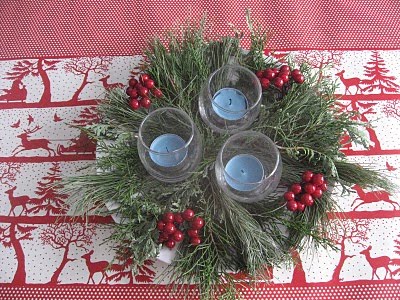
- Christmas centrepiece.


Here's to even more DIY in 2011! (including my wedding - biggest DIY of life...)

Monday, September 20, 2010

next DIY project?

I'm a fan of this idea that I saw over at Full House. Might try it on an old futon I "inherited". We'll see....


Wednesday, June 30, 2010

mmm, flowers.

Not just any flowers, fabric flowers. Thanks for the idea, Dolci Odille.


Thursday, May 20, 2010

Wednesday, March 3, 2010

just for kicks.

I know it's not Christmas, I know. But I had to share these wreaths I saw in my blog travels today. Who says wreaths are just for Christmas anyway? And these are not your Grandmother's wreaths. They even come with tutorials!


BHG.
http://www.livingwithlindsay.com/2009/11/librarians-please-avert-your-eyes.html
http://bleubirdvintage.typepad.com/blog/2009/11/diy-pom-pom-wreath.html
http://www.domestifluff.com/2009/11/how-to-make-a-ruffly-felt-rosette-wreath/

http://www.goinghometoroost.com/2009/12/holiday-diy-magazine-wreath/

LinkWithin

Related Posts Plugin for WordPress, Blogger...